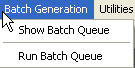
When Virtual Genesys opens, the Batch Generation menu appears at the top of the screen.
![]()
When Virtual Genesys opens, the Batch Generation menu appears at the top of the screen.
![]()
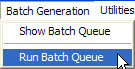
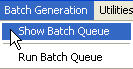
Show Batch Queue displays the list of batches. The queue is set up and scheduled here. Run Batch Queue runs the list of batches previously scheduled.
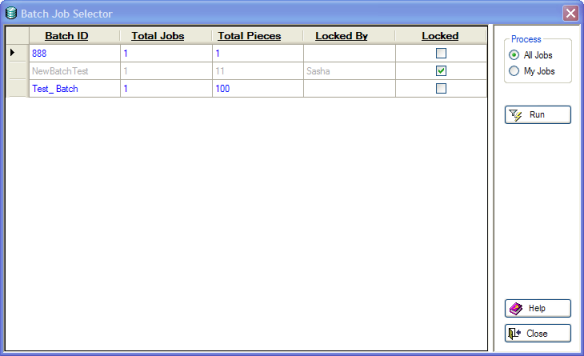
On the Batch Generation menu, click Run Batch Queue.
On the Batch Job Selector screen, under Process, select the batch you want to run. "All Jobs" are company-wide. "My Jobs" are only your jobs. This screen shows all jobs in the batch queue, including those currently being processed by other users, which appear dimmed and unavailable.
If a job is dimmed and unavailable, that batch is locked by the person listed in the "Locked By" column. To select every job, click "All Jobs." If two or more users choose "All Jobs," the utility locks each cell that is currently being processed. To select your own jobs, click "My Jobs."
If you choose "My Jobs," the utility allows you to lock or unlock the selected jobs. No one else will be allowed to run locked jobs at this time. To run the selected jobs, press Run. When a job has finished running, it is removed from the list.
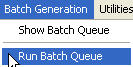
On the Batch Generation menu, click Show Batch Queue.
The Batch Queue screen appears.
A ![]() menu opens at the very top
of the Batch Queue screen.
menu opens at the very top
of the Batch Queue screen.
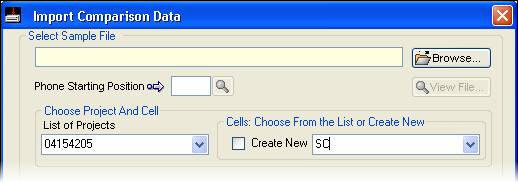
Under Utilities, an Import Comparison File function is available for importing any phone number files to compare with phone numbers in any cell. *** If a phone number file is going to be used in this way, the comparison file must be imported BEFORE the batch is created. ***
![]()
A comparison file can be uploaded to the server once and used multiple times for comparison. To use the imported comparison file multiple times:
-- OR--
NOTE: The same comparison file can be used for all of the cells in a project. First, import the file for just one of the cells. Second, select Unduplicate from data source and choose Current Project for all the cells.
If a comparison file is going to be imported, click Utilities - > Import Comparison File. The Import Comparison Data screen appears.
Browse ![]() to the
phone number file and select it.
to the
phone number file and select it.
Determine the numeric position where the phone number begins in each line of the file.
If necessary,
click View File ![]() to identify this position.
to identify this position.

![]()
In the Time Frame Selection screen that appears, click to enter the Time From and Time To for the date the comparison file was uploaded. Select this for all cells. The utility uses the files added on that date.
![]()
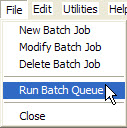
Run Batch Queue is available under File on this screen.
Click Run Batch Queue, and the Batch Job Selector screen appears.
On Batch Job Selector screen, under Process, select the batch you want to run. "All Jobs" are company-wide. "My Jobs" are only your jobs. This screen shows all jobs in the batch queue, including those currently being processed by other users, which appear dimmed and unavailable.
If a job is dimmed and unavailable, that batch is locked by the person listed in the "Locked By" column. To select every job, click "All Jobs." If two or more users choose "All Jobs," the utility locks each cell that is currently being processed. To select your own jobs, click "My Jobs."
If you choose "My Jobs," the utility allows you to lock or unlock the selected jobs. No one else will be allowed to run locked jobs at this time. To run the selected jobs, press Run. When a job has finished running, it is removed from the list.
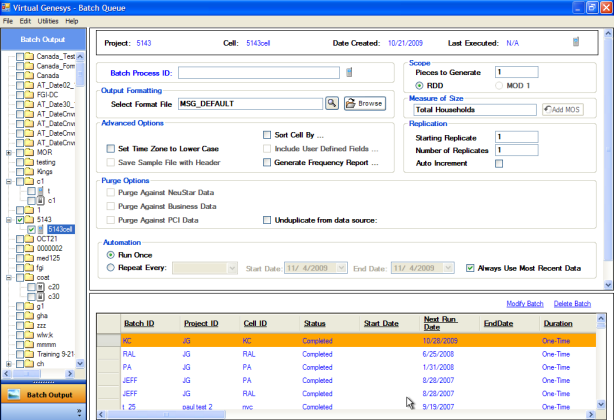
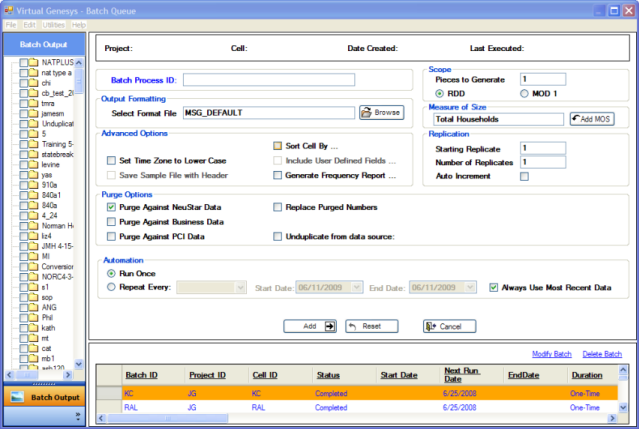
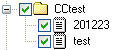
Select Projects or Cells to schedule a batch. Projects are listed in the left panel under Batch Output. To list the cells in a project, double-click on its ID. To select all cells in a project, click the project's check box. To select individual cells for processing, click their check boxes.
Project, Cell, DateCreated, and Last Executed display across the top of the screen as cell information.

Type a Batch name into the Batch Process ID box.
![]()
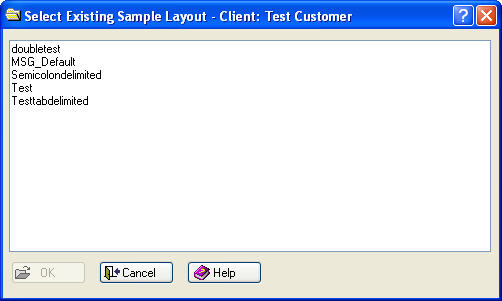
Under Output Formatting, Select Format File displays the default Sample Layout Format. Accept the default Format, or click Browse to select another layout from the Select Existing Sample Layout screen.
![]()
Make additional selections under Advanced Options.

If the Format selected for batch processing does not contain a time zone field, Set Time Zone to Lower Case should not be checked as an option. Otherwise, this will produce an error.
Also, if the Format selected for batch processing contains user-defined fields, then the Include User Defined Fields option will be available.
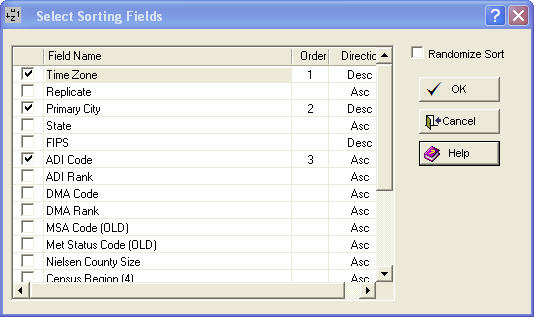
To choose sorting fields in the sample file, click on Sort Cell By. A Select Sorting Fields screen appears. Fields will be sorted in the order in which they are selected. The field selected first will be sorted first. The field selected second will be sorted second, and so forth. Each field has the option to be sorted in ascending (Asc) or descending (Des) direction. Click on Asc or Des to change the direction of the sort for that field. To randomize the sort, select Randomize Sort. Click OK.
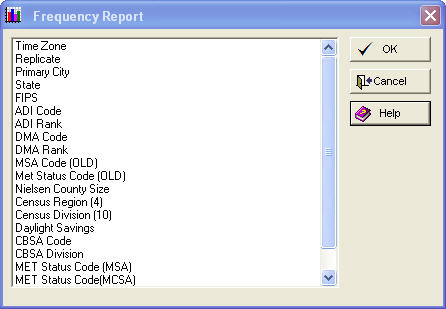
Generate Frequency Report will create a frequency report for one or more fields in the layout. Click the check box. A Frequency Report screen appears. Select any fields and click OK.
Under Purge Options, select the databases against which the generated sample will be purged.

Click Unduplicate from data source. More options appear.

(Unduplicate compares telephone numbers against previously generated samples and removes duplicate records from the generated sample.)
The Unduplicate from data source list offers Not Selected, Current Cell, Current Project, All Available, and Given Time Frame as options.
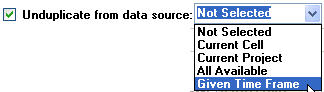
Current Cell unduplicates from the previous sample generated from only that cell. Current Project unduplicates from the previous sample generated from all cells in that project.All Available unduplicates from the previous sample generated from all cells in all projects. Given Time Frame is somewhat different.
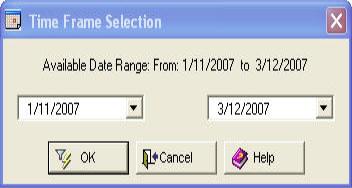
Click Given Time Frame. A Time Frame Selection screen appears. An Absolute time frame has a beginning and an end. A time frame with a Static Start has a beginning but no end. A Rolling time frame is approximately six months. This will be the past six months from the date the sample is generated, and will continue each time sample is generated. A sample generated in December will include June through November. A sample generated in January will include July through December.
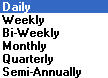
The Repeat Every list offers the flexibility of daily, weekly, monthly, and quarterly processing.
The Start and End Dates are equally flexible with pop-up calendars.
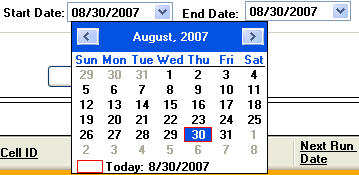
Clicking on the Start Date of 8/30/2007 displays a pop-up calendar.
Clicking on the End Date of 8/30/2007 displays the same pop-up calendar.
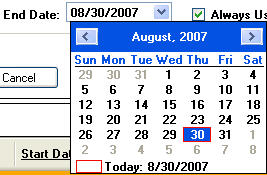
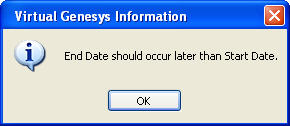
However, the Start Date and End Date can't fall on the day. The End Date needs to occur later in the month. Should these dates conflict, a message reminds the user to change the End Date.
Under Automation, accept the default toRun Once or click the option to Repeat. The option to Always Use Most Recent Data is checked by default. If this option is unchecked, the database that was used when the file was first generated will be used again.

Under Scope, type in a number for Pieces to Generate and select the method of generation, either RDD or MOD 1.
![]()
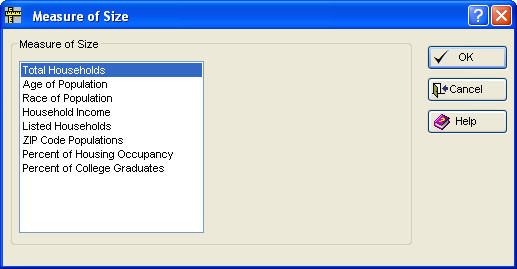
Under Measure of Size, accept the displayed system default or click the Add MOS button.
![]()
If the Add MOS button is pressed, a Measure of Size screen appears. Another MOS can be selected from here.
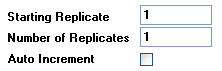
Under Replication, accept the defaults, or type in new numbers (up to three digits) for both Starting Replicate and Number of Replicates. Auto Increment is unchecked by default. If selected, the increment will be the next number up from the previous sample file. For example, if the previous sample file stopped at 10, the next file would begin at 11.
To add this batch to the processing queue, click Add. Click Cancel to stop the addition. Click Reset to return the screen to its default state. Reset can also be pressed after Add or Modify Batch is clicked.
![]()
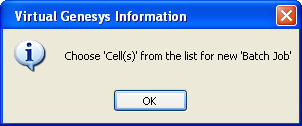
If Add is clicked but no cells are selected, a message reminds the user to select cells.
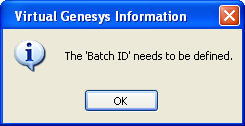
If Add is clicked and cells are selected, but the user has not entered a Batch Process ID, a message reminds the user to type in the Batch ID.
If the addition succeeds, a message confirms the batch was added to the queue.
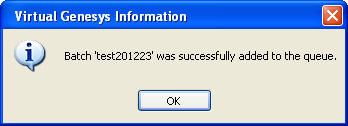
The new batch appears at the bottom of the Batch Queue screen.
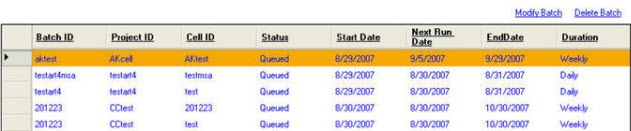
To modify a batch waiting in the queue, click on the batch to highlight it, then click Modify Batch. The batch reloads in the Batch Queue screen. The batch is ready to be modified. After the changes are made, click the Modify button to keep the changes, or click the Cancel button to reject them.
If other cells are in the batch, a message asks if all records should be modified.
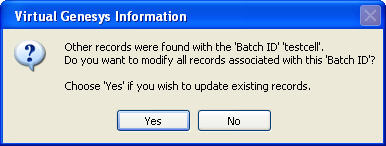
Click Yes or No. If all cells should be modified, click Yes. If only the one cell should be modified (not all cells), click No. Then retype the Batch ID and save that as a separate batch job. The other cells won't change.

To delete a batch waiting in the queue, click on the batch to highlight it, then click Delete Batch. A message asks the user to confirm this action.
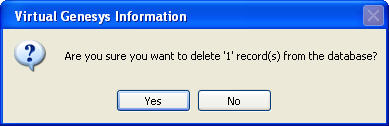
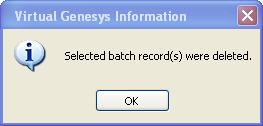
Click Yes or No. To cancel the deletion, click No. To proceed with the deletion, click Yes. When the batch is deleted a message confirms the action taken.
If jobs are scheduled for batch generation and Virtual Genesys is being closed, upon exit, a message asks about proceeding with the jobs.
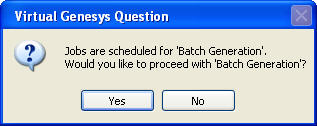
To proceed with Batch Generation, click Yes. Otherwise, click No.
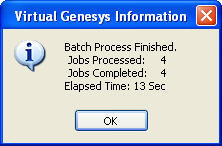
A screen displays Batch Queue in Progress, how many jobs have been processed out of the total number, and the Elapsed Time.

When processing finishes, a screen displays the Jobs Processed, the Jobs Completed, and the Elapsed Time.
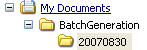
Log files regarding the batch generation process can be found on the user's computer. Look for a folder called BatchGenerationin the My Documents folder. Look for a folder based on today's date, such as 20070830.
Files in this folder include:
Open Virtual Genesys. On the Batch Generation menu, select Run BatchQueue to run batch jobs. Exiting Batch Generation also offers the opportunity for running batches that are queued.
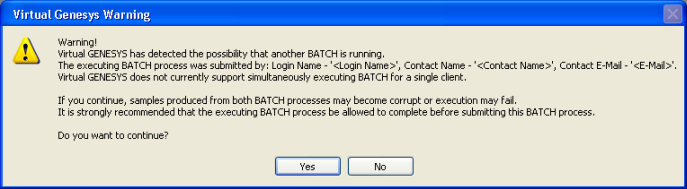
If another user from the same client is simultaneously running Batch, a warning message appears. Click Yes or No to continue or cancel, respectively.
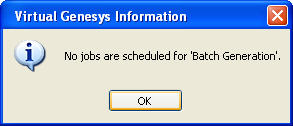
If no jobs are scheduled, a message says so.
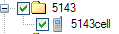
Tree View control on the left side of the screen shows the Cell Phone icon  for cells defined using the Cell Phone database.
The Cell Phone icon appears at the top of the screen for cells defined using the Cell Phone database.
Click thenew View button  (left of the Browse
  button) to see the current layout.
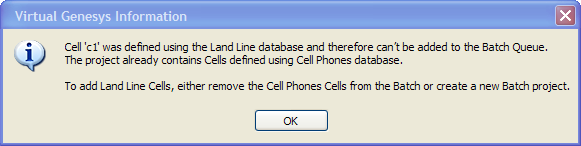
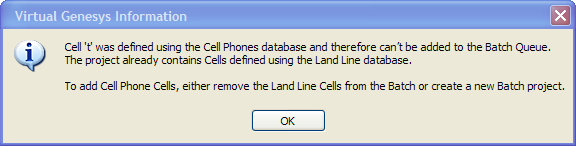
The Tree View doesn't allow you to add both Land Line and Cell Phone cells to the same Batch project. Warnings similar to the ones below appear.
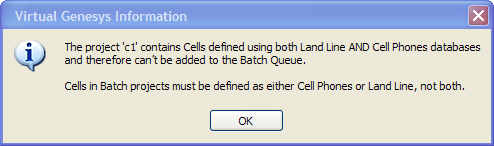
The Tree View doesn't allow you to add a project to a Batch project if it contains both Cell Phones and Land Line cells. A warning similar to the one below appears.
The Batch Queue screen, shown below, dynamically enables or disables items, including the Mod1 generation method  and all Purge Options, based on the kinds of cells added to the Batch project.
Save New Batch and Modify Batch functionalities were modified to account for the different types of cells (Land Line and Cell Phones) in the database.
The Batch projects grid at the bottom of the screen shows the RDDCell generation method for jobs created with the Cell Phones database.
The Batch projects grid is wide enough and has enough columns now that it is best seen in several parts.